#
Active Directory Home Lab with Proxmox - Part 5
Connecting Linux machines to an Active Directory (AD) domain can streamline user authentication and management in mixed-environment networks. In this post I will guide you through the process of joining a Linux machine to a Windows Active Directory domain, allowing for centralized authentication and simplified access control for your Linux servers.
#
Setting Up Your Web Server
To begin, we'll provision a new AlmaLinux container.
You need to make a privileged container in order to join it to the domain. To do this you first make a regular LXC, make a backup and restore it as privileged.

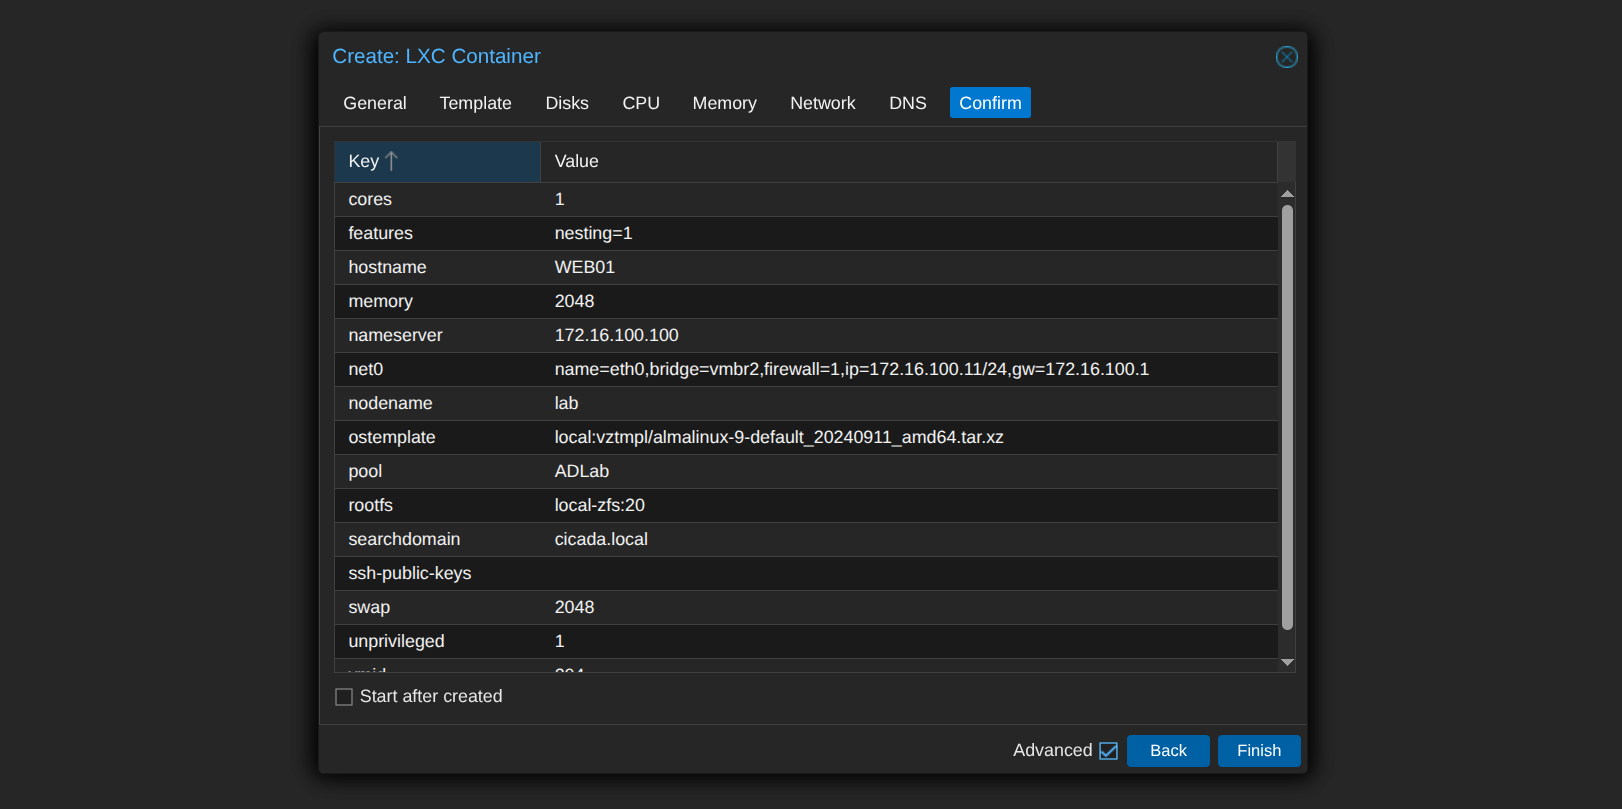
This container will serve as our web server and the machine we'll join to the Active Directory domain.
#
Installing Necessary Packages
Before joining the domain, you need to install several key packages that facilitate communication and integration with Active Directory. It's always a good practice to ensure your system is up-to-date before installing new software.
First, update and upgrade your existing packages:
[root@WEB01 ~]# yum update && yum upgradeNext, install the required packages. These include sssd (System Security Services Daemon) for authentication and identity management, realmd for domain joining, oddjob and oddjob-mkhomedir for home directory creation, adcli for Active Directory command-line tools, samba-common and samba-common-tools for Samba utilities, krb5-workstation for Kerberos authentication, and openldap-clients for LDAP client utilities.
[root@WEB01 ~]# yum update && yum upgrade
[root@WEB01 ~]# yum install sssd realmd oddjob oddjob-mkhomedir adcli samba-common samba-common-tools krb5-workstation openldap-clients
#
Joining Active Directory
With the necessary packages installed, you can now join your AlmaLinux machine to the Active Directory domain. This is done using the realm command, which simplifies the process of configuring Kerberos and SSSD for domain integration.
Execute the following command, replacing CICADA.LOCAL with your actual domain name and Administrator with an Active Directory user account that has permissions to join machines to the domain:
[root@WEB01 ~]# realm join CICADA.LOCAL -U Administrator
Password for Administrator@CICADA.LOCAL: <REDACTED>
You'll be prompted to enter the password for the Administrator account. If the join is successful, you can verify it by checking the machine's domain status. The id command with the machine's hostname followed by a dollar sign and the domain (web01$@CICADA.LOCAL) should show that the machine is recognized as a domain computer.
[root@WEB01 ~]# id 'web01$@CICADA.LOCAL'
uid=136801114(web01$@cicada.local) gid=136800515(domain computers@cicada.local) groups=136800515(domain computers@cicada.local)
As you can see, our machine is now recognized as a domain computer within Active Directory.
#
Configuring SSSD and PAM for AD Integration
To enable users to authenticate against Active Directory and have their home directories created automatically upon login, you need to configure SSSD and edit the PAM (Pluggable Authentication Modules) configuration for SSH.
First, ensure openssh-server is installed, as it's crucial for remote access and is often a primary way users will interact with the joined Linux machine.
[root@WEB01 ~]# dnf install openssh-server
[root@WEB01 ~]# sudo systemctl start sssd
[root@WEB01 ~]# sudo systemctl enable sssd
Next, start and enable the sssd and oddjobd services. SSSD is responsible for handling authentication and identity lookups against Active Directory, while oddjobd (along with oddjob-mkhomedir) helps with tasks like creating home directories for domain users.
[root@WEB01 ~]# sudo systemctl start oddjobd
[root@WEB01 ~]# sudo systemctl enable oddjobd
Now, edit the PAM configuration for SSH (/etc/pam.d/sshd) to allow SSSD to handle authentication and to enable automatic home directory creation.
[root@WEB01 ~]# vi /etc/pam.d/sshd
auth       required     pam_sepermit.so
auth       include      system-auth

account    required     pam_nologin.so
account    include      system-auth

password   include      system-auth

session    optional     pam_keyinit.so force revoke
session    required     pam_loginuid.so
session    include      system-auth
session    required     pam_limits.so
session    required     pam_unix.so
session    optional     pam_oddjob_mkhomedir.so skel=/etc/skel/ umask=0077 # For auto-home dir creation
session    optional     pam_systemd.so
Finally, configure the sssd.conf file to specify how SSSD should interact with your Active Directory domain. This file defines the domain settings, default shell, home directory creation, and access providers.
[root@WEB01 ~]# vi /etc/sssd/sssd.conf
[sssd]
domains = cicada.local
config_file_version = 2
services = nss, pam

[domain/cicada.local]
ad_domain = cicada.local
krb5_realm = CICADA.LOCAL
default_shell = /bin/bash
krb5_store_password_if_offline = True
cache_credentials = True
realmd_tags = manages-system joined-with-adcli
id_provider = ad
fallback_homedir = /home/%u
use_fully_qualified_names = False
ldap_id_mapping = True
access_provider = ad
#
Authenticating with Kerberos and SSH
To enable Kerberos authentication, you need to configure the /etc/krb5.conf file on your local machine. This file tells your system how to locate the Kerberos Key Distribution Center (KDC) for your domain. Add the following configuration:
[libdefaults]
    default_realm = CICADA.LOCAL
    dns_lookup_realm = true
    dns_lookup_kdc = true
    udp_preference_limit = 0

[realms]
CICADA.LOCAL = {
     kdc = dc01.cicada.local
     admin_server = dc01.cicada.local
     default_domain = cicada.local
}

[domain_realm]
    .cicada.local = CICADA.LOCAL
    cicada.local = CICADA.LOCAL
Now, you can request a Kerberos Ticket Granting Ticket (TGT) for a domain user and then use it to SSH into the Linux machine without needing to enter a password for each connection.
First, use kinit to obtain a TGT for your domain user (e.g., w.wonder):
$ kinit w.wonder
Password for w.wonder@CICADA.LOCAL: P@ssw0rd123
After entering the password, you can verify that you have a valid TGT using klist. Finally, you can SSH into your AlmaLinux machine using your domain username.
$ klist
Ticket cache: FILE:/tmp/krb5cc_1000
Default principal: w.wonder@CICADA.LOCAL

Valid starting       Expires              Service principal
05/25/2025 18:20:11  05/26/2025 04:20:11  krbtgt/CICADA.LOCAL@CICADA.LOCAL
  renew until 05/26/2025 18:20:07
05/25/2025 18:20:21  05/26/2025 04:20:11  host/web01.cicada.local@CICADA.LOCAL
  renew until 05/26/2025 18:20:07
$ ssh w.wonder@web01.cicada.local
You should be logged in without being prompted for a password, demonstrating successful Kerberos authentication and Active Directory integration!
#
Conclusion
By following these steps, you've successfully joined your Linux machine to a Windows Active Directory domain. This setup allows for centralized user authentication and management, significantly simplifying administration in environments with both Windows and Linux systems. Users can now seamlessly log in to your Linux machines using their Active Directory credentials, benefiting from single sign-on capabilities.