#
Active Directory Home Lab with Proxmox - Part 4

In this part of our Active Directory Home Lab series, we'll focus on enhancing the security and visibility of our environment by adding network monitoring. Since we're utilizing PfSense as our software-based firewall, it provides a convenient platform for deploying additional security tools. Specifically, we'll be setting up Suricata, a powerful intrusion detection and prevention system (IDS/IPS), to monitor traffic and detect potential threats. This post will guide you through configuring Suricata and creating custom rules to detect attacks, such as those we simulated in Part 3.
#
Suricata Setup
To begin, navigate to the PfSense web interface and proceed to System > Package Manager > Available Packages. Search for Suricata and install the latest version. Once installed, go to Services > Suricata to start configuring the tool. We’ll add interfaces and tweak some options, but the default settings should suffice for most purposes. For our ruleset, we'll use the ETOpen Emerging Threats as a foundation.
#
Adding Monitoring Interfaces
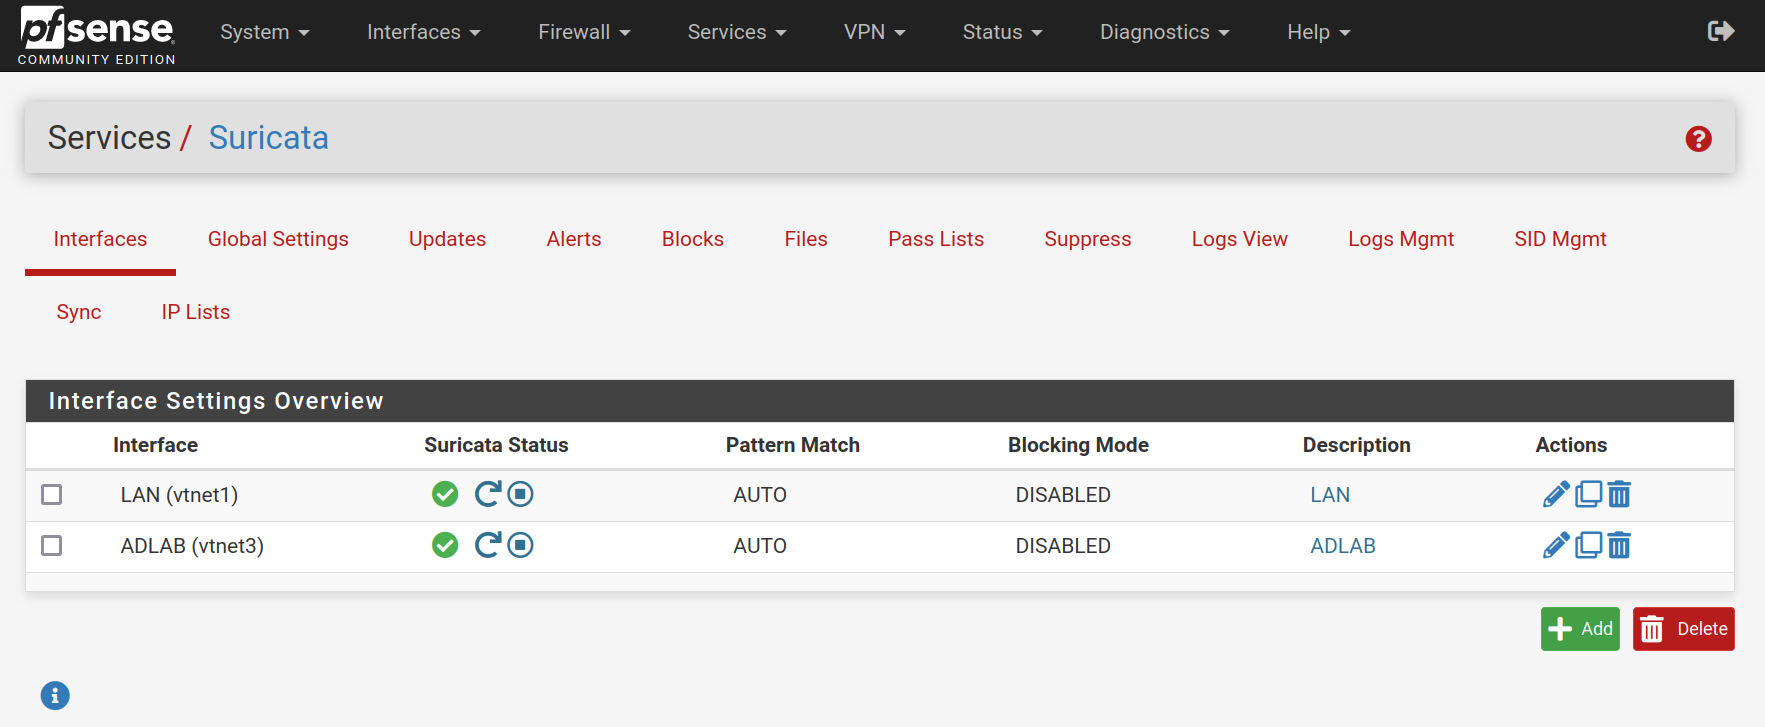
Under the Interfaces tab, select the interfaces that Suricata will monitor. For our lab, I chose the LAN and ADLAB interfaces to observe traffic between the attacking VM on the LAN and the AD network.
#
Creating Custom Detection Rules
Next, let's create custom rules tailored to our lab environment. We’ll do this by editing one of the interfaces and navigating to the rules tab.
#
Detecting Evil-WinRM Traffic
Our first custom rule will detect Evil-WinRM traffic, which is often used for remote management in penetration testing scenarios. For more information on setting up Remote Management on your target hosts, refer to Part 3 of this series.

To build this rule, we need to understand how an authentication request from Evil-WinRM appears in network traffic. Using WireShark, we can capture an authentication attempt from a host on the LAN interface. We run the following command in a Linux terminal:
$ evil-winrm -i 172.16.0.17 -u 'cicada.local\winnie.wonder' -p 'P@ssw0rd123'To capture this traffic in PfSense, go to Diagnostics > Packet Capture and select the appropriate interface.
Tip
Ensure you target the domain-joined host from a machine outside of the LAN to properly capture traffic. If you capture traffic from devices within the same LAN, PfSense may not log the packets unless you create a port mirror. At the final section, I will discuss how to setup a SPAN port and route traffic to another machine to monitor traffic.
In WireShark, we can focus on the packet containing the authentication request.
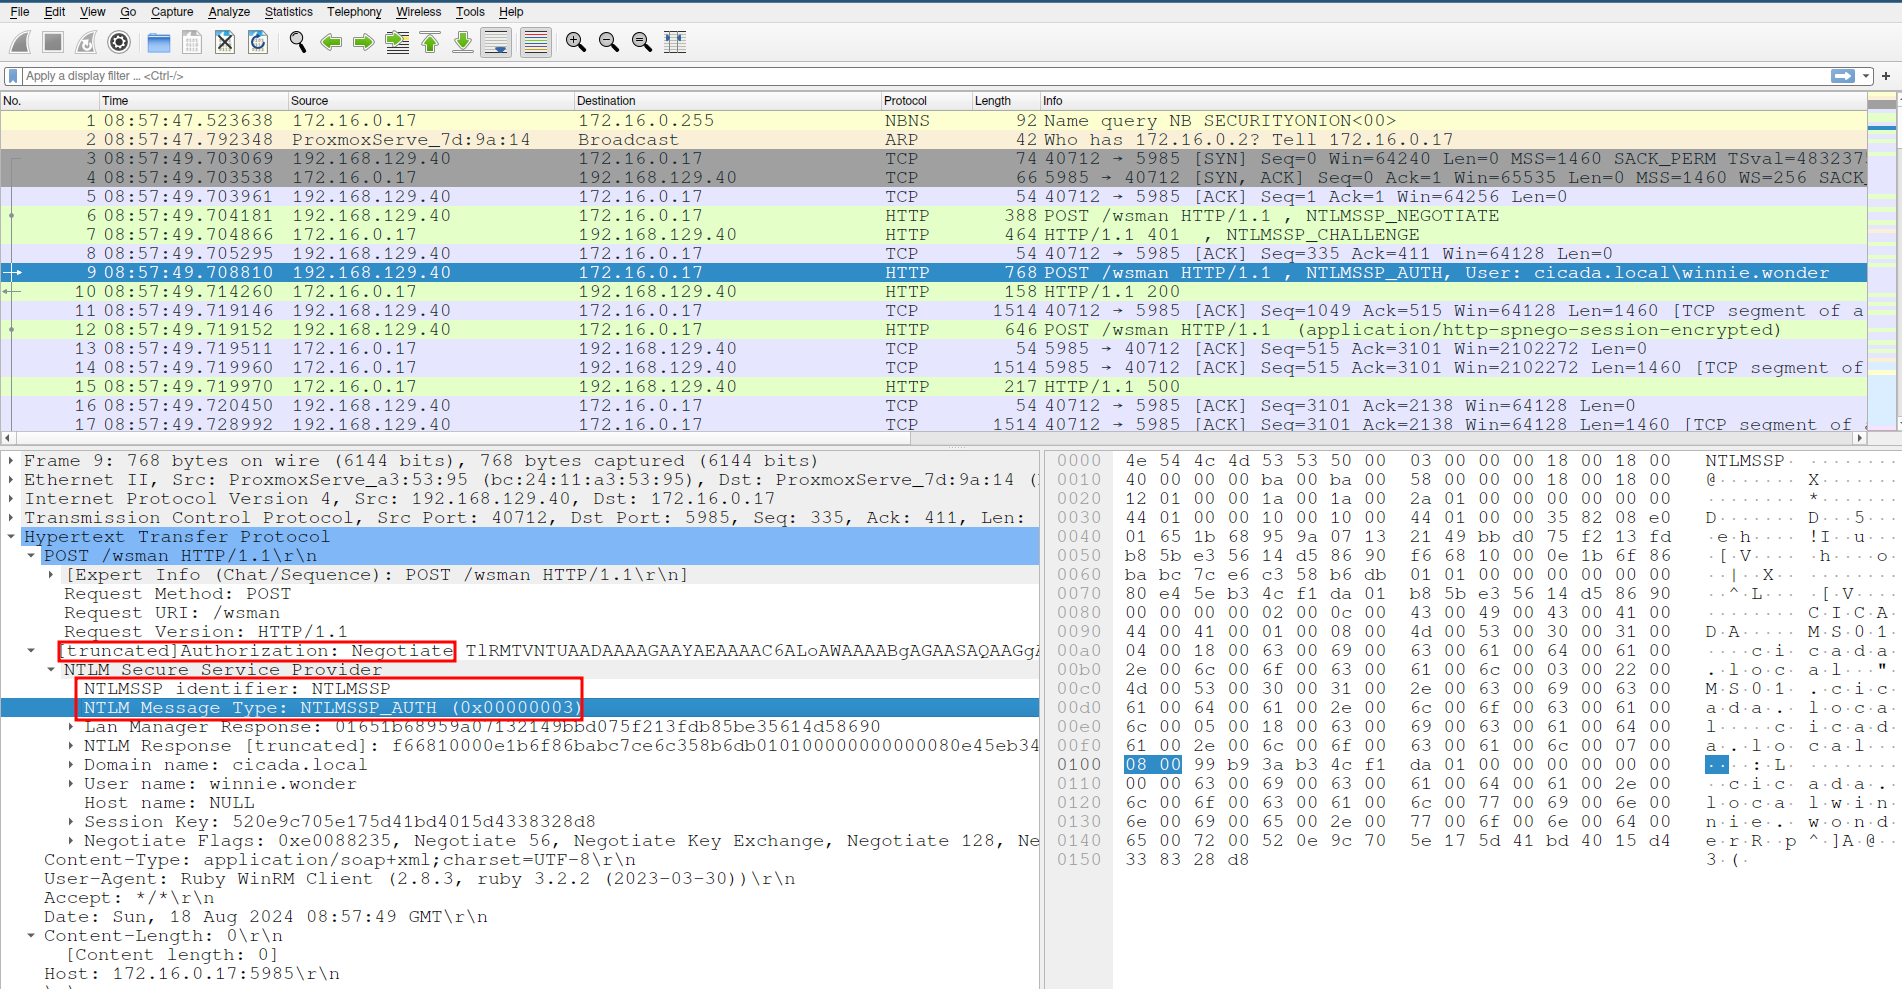
The captured packet shows the authentication request from winnie.wonder. Based on this, we can now craft our Suricata rule:
alert http any any -> any 5985 (msg: "Connection via Evil-WinRM Detected"; flow:established,to_server; http.method; content:"POST"; http.header; content:"User-Agent: Ruby WinRM Client"; content:"Authorization: "; base64_decode:bytes 13,offset 10,relative; base64_data; content:"NTLMSSP"; content:"|03|"; classtype:bad-unknown; sid:9990001; rev:1;)Snort is a similar IDS/IPS solution that can be installed on PfSense, but has slightly different syntax.
Explanation:
- The rule targets HTTP traffic performing a POST request on port 5985.
- It looks for the
Ruby WinRM Clientstring in the User-Agent header, a unique identifier for Evil-WinRM. - The rule then examines the Authorization header, decoding a portion of the Base64 encoded data to detect the NTLMSSP authentication type.
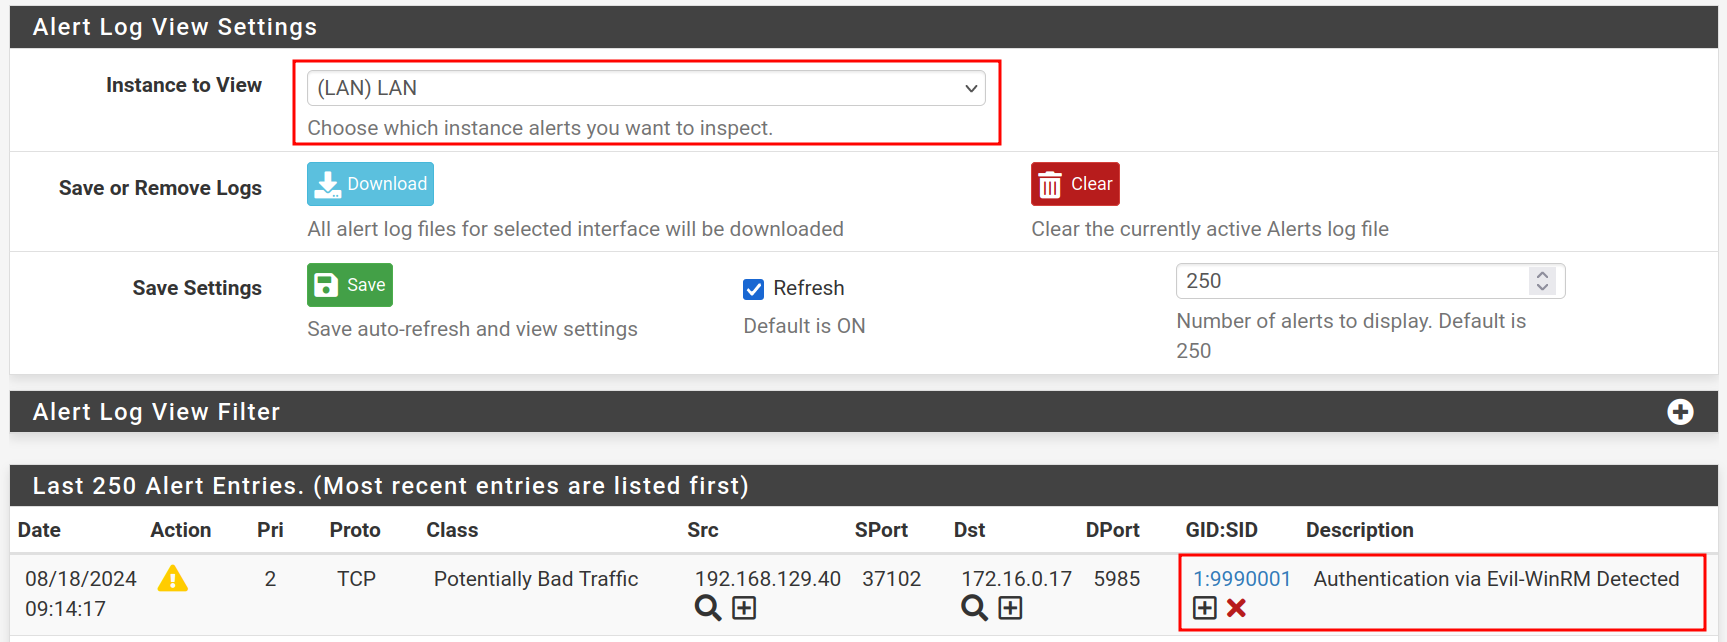
With this rule in place, Suricata will trigger an alert whenever someone tries to authenticate using Evil-WinRM using the default settings. We could tune this rule even further, or write additional rules that alert on traffic even if the attacker changes the User-Agent.
#
Detecting SMB Authentication
Similarly, we can create a custom rule to detect SMB authentication attempts within the CICADA domain. The below rule looks for the SMB header with the NTLMSSP authentication type set to 03 and the domain name in hex format, separated by null bytes.
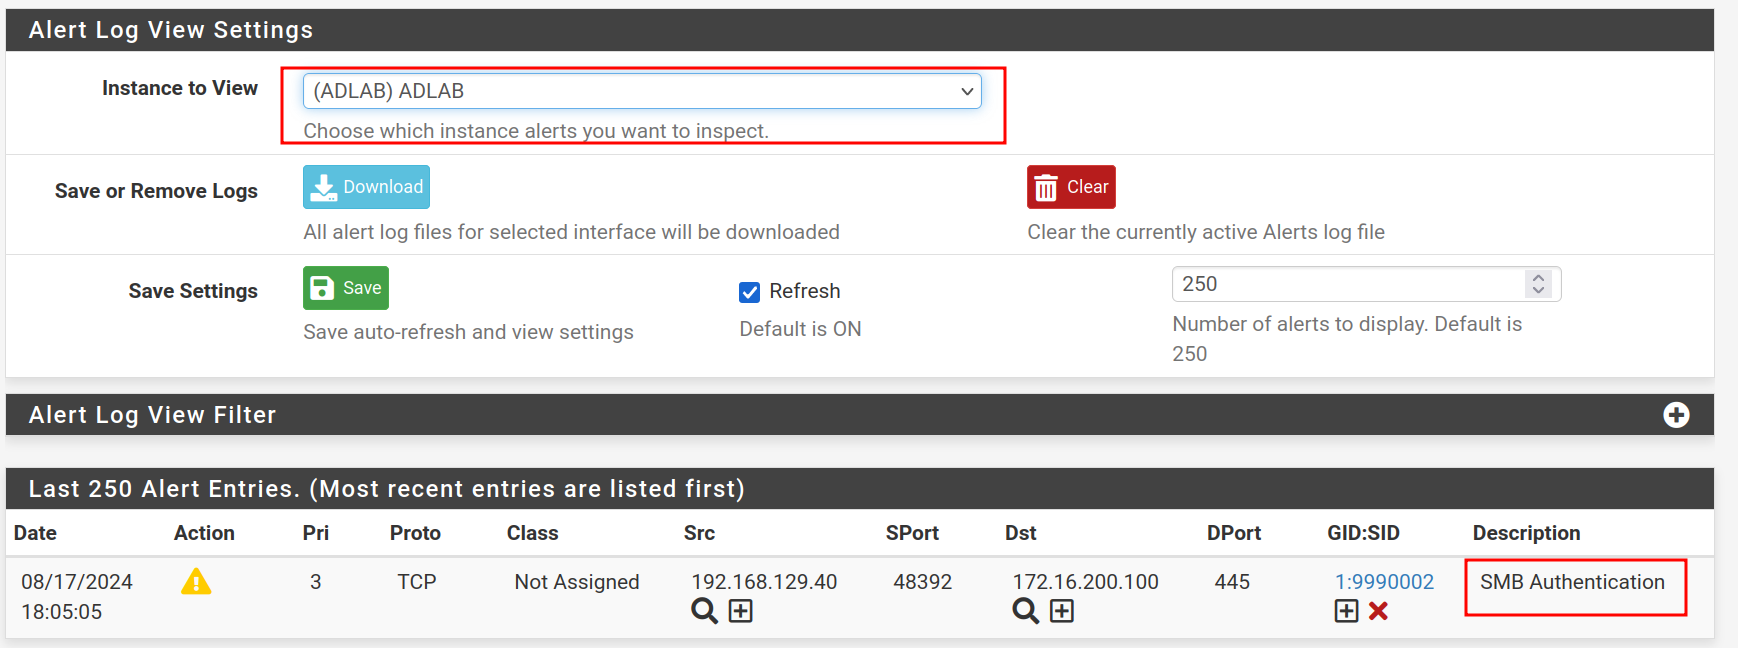
alert smb any any -> any 445 (msg: "SMB Authentication";flow:established,to_server; content:"|FE|SMB";content:"NTLMSSP"; content:"|03|";distance: 1; content:"|63 00 69 00 63 00 61 00 64 00 61|"; sid:9990002; rev:1;)This rule was applied to the ADLAB interface. To test it, I used NetExec to initiate an SMB authentication from outside the ADLAB interface:
$ nxc smb 172.16.200.100 -u 'winnie.wonder' -p 'P@ssw0rd123' -d 'cicada.local'As expected, Suricata raised an alert upon detecting the authentication:
#
Detecting AS-REPRoasting
In the third part of our series, we executed the following command to perform an ASREPRoasting attack on domain users:
$ GetNPUsers.py CICADA.LOCAL/ -dc-ip 172.16.200.100 -no-pass -usersfile valid_users -format hashcatNow, let’s examine what this traffic looks like in WireShark
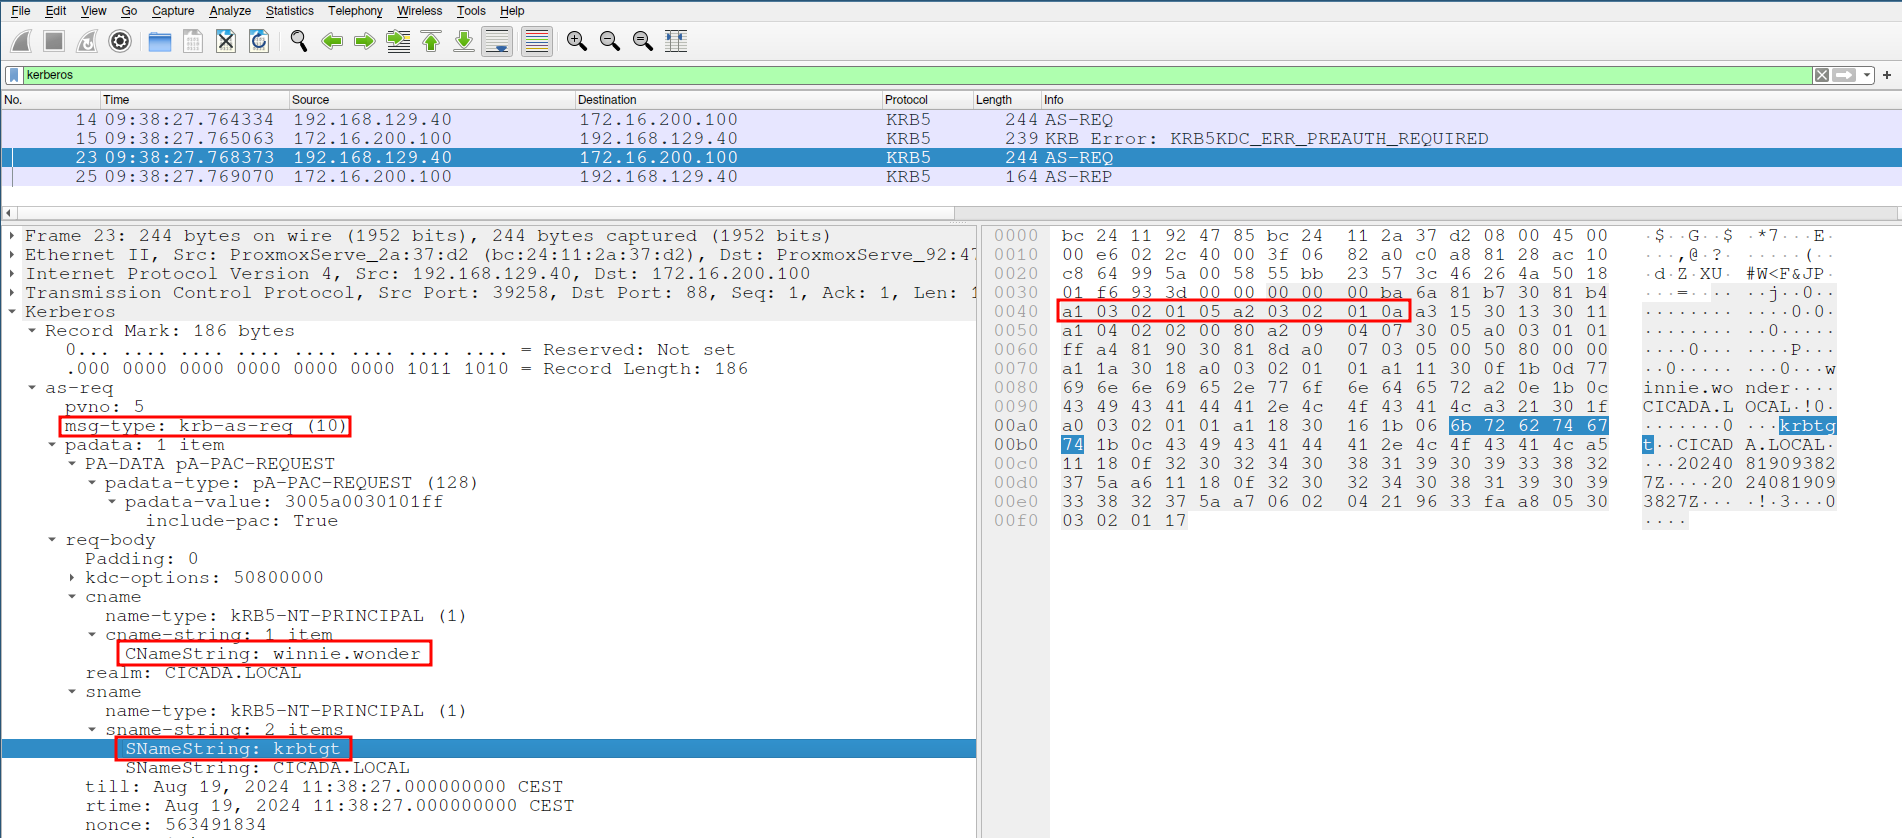
In this scenario, we identified one user with preauthentication disabled. By analyzing the AS-REQ packet, we can craft a Suricata rule to detect this type of attack:
alert tcp any any -> any 88 (msg:"Possible AS-REP Roasting Attack"; flow: to_server, stateless; content:"|a0 07 03 05 00 50 80 00 00 a1|"; content:"|6b 72 62 74 67 74|"; fast_pattern; content:!"|a2 03 02 01 0c|"; sid:9990003; rev:1;)Rule Breakdown:
- The rule monitors TCP traffic on port 88, which is used by Kerberos.
- It looks for a specific sequence of bytes that indicate the presence of an AS-REQ request.
- The string krbtgt (represented as
6b 72 62 74 67 74in hexadecimal) is a key identifier within the packet. - We also check for the absence of the byte sequence
a2 03 02 01 0c, which indicates the presence of preauthentication. The lack of this sequence suggests the possibility of an AS-REP Roasting attack.
By implementing this rule, Suricata will trigger an alert when it detects a pattern consistent with an ASREPRoast attack, helping to protect your domain from this common exploitation method.
#
Creating SPAN Ports on Proxmox
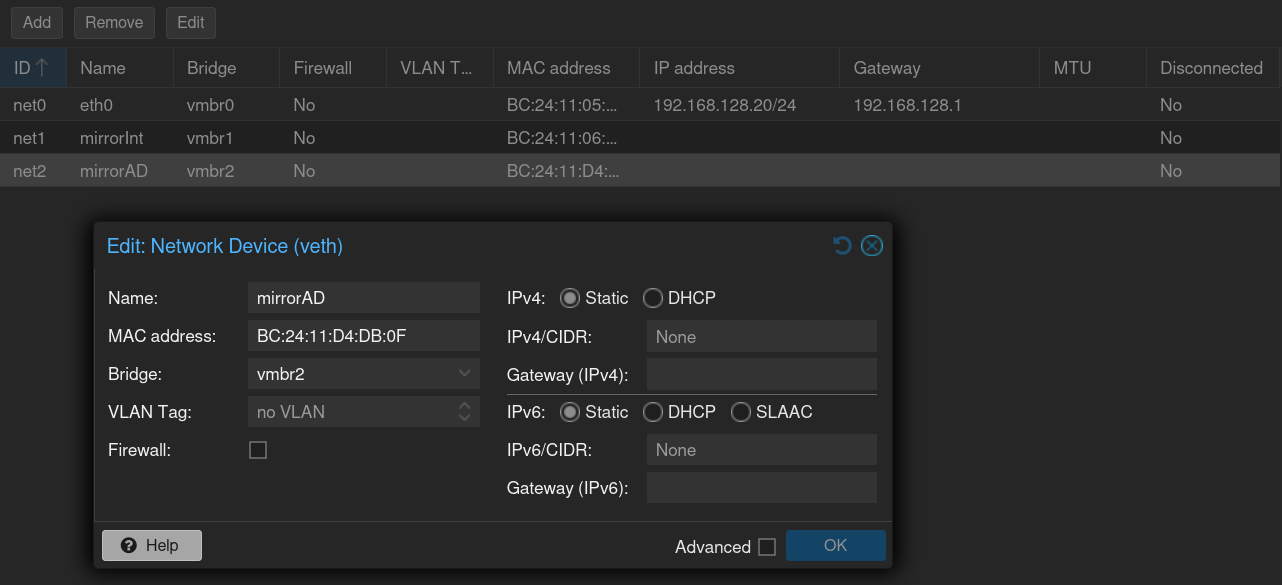
Start by creating a new LXC and assign at least 2 cores, 2GB of RAM and 25GB of storage. After creating the container, add another network interface for the ports you want to mirror. In my case I added interfaces vmbr1 and vmbr2. The interface is going to send copies of packets of machines connected to the switch to the container. Make sure the firewall is unchecked for these interfaces.
Log in to the container and run the following commands.
$ apt update && apt upgrade -y
$ ip a | grep @
2: eth0@if95: <BROADCAST,MULTICAST,UP,LOWER_UP> mtu 1500 qdisc noqueue state UP group default qlen 1000
3: mirrorInt@if96: <BROADCAST,MULTICAST,UP,LOWER_UP> mtu 1500 qdisc noqueue state UP group default qlen 1000
4: mirrorAD@if97: <BROADCAST,MULTICAST,UP,LOWER_UP> mtu 1500 qdisc noqueue state UP group default qlen 1000
If the interfaces are down, just run ip link set <INT_NAME> up. Next, open the shell on your Proxmox server, and run the command:
# ip link show | grep <LXC_ID>where the <LXC_ID> is the id of the Proxmox node where Suricata is running.

The first result is the interface that is connected to my home network, the last two are going to be the SPAN ports. Now we run the following command in the Proxmox shell to create the SPAN ports on the switch:
# ovs-vsctl \
  -- --id=@veth101i1 get Port tap101i1 \
  -- --id=@101m1 create mirror name=mirrorInt \
  select-all=true output-port=@veth101i1 \
  -- set Bridge vmbr1 mirrors=@101m1
# ovs-vsctl \
  -- --id=@veth101i2 get Port veth101i2 \
  -- --id=@101m2 create mirror name=mirrorAD \
  select-all=true output-port=@veth101i2 \
  -- set Bridge vmbr2 mirrors=@101m2
Replace the link names, ids and bridge name according to your setup.
Next we need to edit the configuration file of Suricata located at /etc/suricata/suricata.yaml:
- Add our IP ranges to the
HOME_NETvariable undervarsto hold[172.16.0.0/24,172.16.100.0/24]. - Change the interface under
af-packetfrometh0to the monitoring interface. I added bothmirrorIntandmirrorADas an interface and assigned it acluster-idof 99 and 100 respectively. - Change the default rule path under
default-rule-pathto/etc/suricata/rulesand add anotherrule-filesvalue for any local rules (e.g.local.rules). - Create the custom rule file under
/etc/suricata/rules/local.rules. Here we can place our custom rules we created earlier.
Finally we can restart Suricata on the container and monitor the two added interfaces. Any alerts will be logged to fast.log.
$ systemctl enable suricata
$ systemctl restart suricata
$ suricata -i mirrorInt -i mirrorAD &

$ tail /var/log/suricata/fast.log
After this, we should be able to capture all traffic coming from our network in pfSense (even same-LAN traffic). One issue we are having now is that the port mirror command needs to be ran each time the container is restarted. It is possible to create a hookscript for this. Check out this post to create a custom script to run at VM start and stop. Since we created a LXC, it is (at the time of writing) not possible to create hookscripts for containers, but you can always create a hookscript on the pfSense VM that creates the SPAN ports at boot for the Suricata container.
#
Conclusion
In this part we have seen how we can leverage Suricata to detect malicious traffic on our network. We have also learned how we can write our own rules based on IOCs. By implementing these custom rules, you can enhance the security of your Active Directory lab environment, gaining visibility into specific attacks and unauthorized access attempts.